Daddy’s Girl Chatelaine
Kraft-Tex project for July color of the month Marsala


Created by: Normajean Brevik seasew@yahoo.com
I probably don’t need to tell you how sentimental quilters can get
over a simple article of clothing. This beautiful and functional chatelaine is made
from a men’s necktie and is perfect for the sentimentalist and recyclist in all
of us. The use of the amazing leather-like product called Kraft-tex ™ by C and T Publishing (ctpub.com) makes this an easy and quick
project that is sure to stir memories of the person who wore the necktie.
Beginners and experts alike will enjoy the ease of this project that simply
adds pockets and a pin cushion to a ready-made tie.
Material List:
*Men’s necktie, cleaned and spot free
*Men’s necktie, cleaned and spot free
· Kraft-tex ™, I used prewashed Marsala color but Kraft-tex comes
in a variety of colors
· ¼” satin Ribbon for loops and scissors leash
· 3 - ½” loose leaf ring binder rings or a small spring clips
· Thread to coordinate with the project for top stitching
· Fiber fill for pin cushion
· Clips to hold Kraft-tex ™ in place while sewing (do not pin through Kraft-tex ™)
Let’s begin:
Measuring for the overall
correct length of your chatelaine is simple. Drape the necktie around your neck
and decide what length is best for you. Mine measures 50“. NOTE: The end
that you will shorten is the NARROW end of the tie NOT the wide end! Once
you’ve decided on a good length add ½” for turning the raw edge and cut off the
remainder. (Save this cut piece to create your pin cushion later.) Tuck the raw
edge into the tie to form a finished edge and stitch closed.

Pockets and Tabs Pattern Directions:
There are only 5 simple pattern pieces to create for your
Kraft-tex. Wide end inside pocket (1) and wide end outside pocket (1), scissors
pocket (1), tabs for pin cushion and scissors leash (2).
(Please note, I am right handed and wanted the scissors to be on
the right. If you are a lefty then adjust the angle of the wide pocket and
reverse the placement on the tie.)
· Wide End outside pocket, pattern: Each necktie will differ in
shape and width so you will need to make a photocopy of the lower portion of
the wide end of the actual necktie in your copier (reducing the copy size to 95%) to have a pattern to work
with.

1. Once you
have made your copy carefully measure up 6" from the tip of the tie copy and
draw a line.
2. Cut out
the pattern using your drawn line as the top of the pattern and around the rest
of the copy.
3. Create a
pocket angle. Measure 2” up on the left edge bottom (edge NOT tip) and make a
small mark.
4. Use a ruler to draw a line from the mark you just made to the top of the right-side edge and cut. (see photos)

· - Wide end inside pocket: cut Kraft-tex ™ 2 ½” x 5 ½” Use the
pattern that you created for the outside pocket as a guide to cut the bottom
point of the pattern for the inside pocket.
· - Narrow End scissor holster is cut after the length is determined
and raw edges turned. Measure the width of the narrow end and subtract 1/8” Cut
a piece of Kraft-tex ™ by
that measurement X 7”.
· - Tabs are measured and cut after all the other pieces have been
sewn.
General directions for cutting and placement of Kraft-tex pieces:
· DO NOT USE PINS ON KRAFT-TEX. USE A LOW TACK DOUBLE SIDED
REMOVABLE TAPE IF YOU NEED TO SECURE THE PATTERN PIECES FOR CUTTING. (I just
held them with my hand to trace)
· Trace the pattern pieces to the right side of the Kraft-tex with
pencil and cut out pieces.
Sewing directions:
Inside front pocket - Begin by centering and lining up your inside front pocket to the tie. Use clips to hold in place and top stitch the Kraft-tex to the tie around the sides and bottom ONLY.
Inside front pocket - Begin by centering and lining up your inside front pocket to the tie. Use clips to hold in place and top stitch the Kraft-tex to the tie around the sides and bottom ONLY.

· Top front pocket, pattern – Line up over the inside pocket and
use clips to hold in place. Top stitch to tie around the sides and bottom ONLY.


· Scissors holster, pattern – Fold the stitched end up 2 ½” and
crease to form the holster. Line up the folded bottom at the bottom of the narrow
end of the tie. Use clips to hold the holster in place. Top stitch to tie all
the way around the outside of the holster.


·
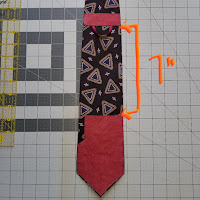
Top tabs- The tabs are measured and added now. The size is determined by measuring 7” from the top of both the scissor holster and wide end pocket. Cut a piece of Kraft-tex the width of that part of the tie minus 1/8” X 1”. Ribbon loops (below) will be added before sewing to the tie.

Top tabs- The tabs are measured and added now. The size is determined by measuring 7” from the top of both the scissor holster and wide end pocket. Cut a piece of Kraft-tex the width of that part of the tie minus 1/8” X 1”. Ribbon loops (below) will be added before sewing to the tie.


·
Ribbon Loops - Cut 4” of ribbon for each loop. Position your tabs
and place ribbon ends 1” under the tab to create the loop (the ends will be
secured when caught in the top stitching). Secure with clips and stitch close
to the edge all the way around both tabs.
Pin Cushion directions:
· Using the left-over tail piece that you cut from the tie: Stitch by hand or machine a little pouch with the tie end and stuff with fiber fill to create a pin cushion. Turn the raw edges in and close. Add a satin ribbon loop. (Note: I opened up the small end piece and placed right sides together to seam it, then stuffed and stitched the top closed and added the ribbon loop.)


Final touches:
·
Ribbon leash for your scissors – Create a looped knot at ends of a
piece of ribbon approximately 20” long (adjust as you see fit). Attach your
tiny ring binder clips to either end of the loops. Clip one end to your
scissors and the other to the ribbon loop above the holster.
·
Pin Cushion – Attach another tiny ring binder clip to both your
pin cushion and the loop on other side of the chatelaine.


I hope that you enjoy your new sentimental heirloom.
Kraft-tex can be purchased at: ctpub.com in loads of yummy colors.